AppBar 가 무엇인지
고유명사
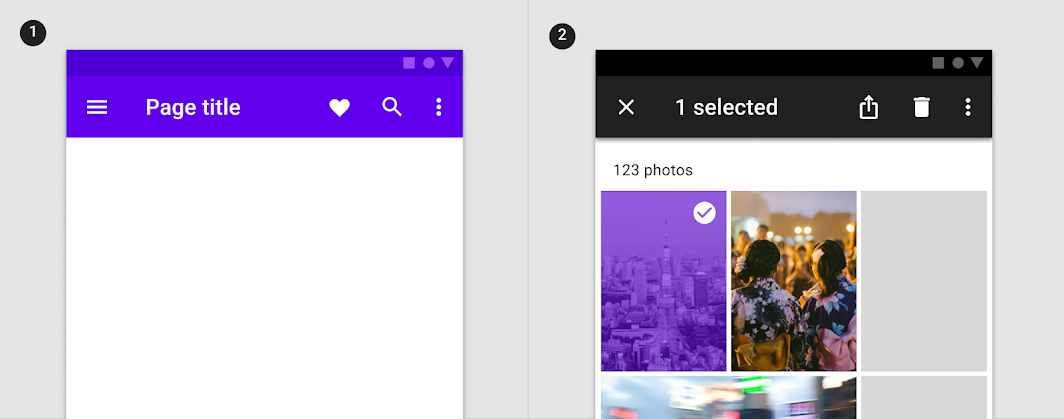
- AppBar는 현재 화면의 타이틀을 포함하고, 위 그림에서 볼 수 있는 좋아요(하트 버튼) 버튼, 검색 버튼, 더보기 버튼 등 현재 화면에서 사용자가 할 수 있는 다양한 action을 담고 있는 막대 모양의 뷰이다.
- 안드로이드에서 App bar라고 하는 것은Material Design에서 정의하는 상단의 바를 말한다.
App bar의 각 명칭
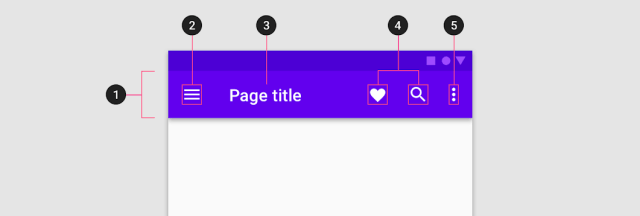
1. Container
2. Navigation icon (optional)
3. Title (optional)
4. Action items (optional)
5. Overflow menu (optional)
App bar라고 하는 것은 앞에서 말한 대로 Material Design의 디자인 명칭이고, 실제 구현되는 건 ActionBar 또는 Toolbar이다. 이게 좀 혼란스러운 부분이 많은데, 히스토리를 좀 알아야 한다. ActionBar API reference를 살펴보자.
ActionBar and Toolbar
ActionBar는 Android 3.0 (API level 11)이 나오면서 Activity에 붙은 형태로 등장했다.
이후로 쭈욱 ActionBar가 사용되다가 Android L (API level 21)부터 Toolbar widget을 사용하여 ActionBar를 사용할 수 있게 됐다. ActionBar는 Activity에 종속적인 문제와 함께, 안드로이드 버전에 따라 다르게 동작할 여지가 있었다. Toolbar는 Activity 종속성도 없지만, support library를 통해 지원이 시작되어 호환성 문제도 없었다. 그럼 그냥 Toolbar를 쓰면 될 거 같은데, 왜 ActionBar형태로 사용하도록 지원하는 걸까? ActionBar 형태의 테마는 여전히 사용되고 Backward compatibility도 지원해야 하므로 Toolbar를 생성해서 사용하되, 이걸 ActionBar에 호환되도록 만든 것으로 보인다.
결론은 ActionBar는 과거의 유물이고 Toolbar로 대체되는 게 맞겠지만,
App bar로서 ActionBar도 여전히 유효한 형태이고 예전 버전 호환성을 유지해야 하기 때문에
1) ActionBar형태를 사용하되, 구현은 Toolbar로 하는 방법과
2) ActionBar를 사용하지 않도록 설정하고 Toolbar만을 사용하는 두 가지 전부 유효한 상황이다.
참고로 ActionBar의 사용 유무는 테마에서 결정된다.
예를 들어 다음과 같이 NoActionBar 테마를 사용하면 ActionBar를 사용하지 않는다.
<ActionBar와 ToolBar의 개념 및 차이점>
과거 안드로이드는 ActionBar가 기본으로 존재하였고 그것을 커스터마이징 해서 각 앱에 맞게 변경해서 사용하였습니다.
툴바는 안드로이드 5.0 (API Level 21)부터 추가된 위젯(Widget)으로 앱에서 가장 중요한 액션 또는 자주 사용되는 액션들을 제공하는 앱바(AppBar)를 만들 때 사용됩니다.
예전에는 AppBar를 만들때 ActionBar클래스를 사용하여 만들어졌는데 그래서 AppBar를 ActionBar라고 부르기도 하며 아직까지 많은 곳에서 이 두 용어를 혼용해서 사용합니다.
툴바가 나온 이유는 새로운 버전의 안드로이드가 릴리즈 됨에 따라 액션바의 다양한 기능들이 추가되었기 때문에 필요성이 대두되게 되었습니다.
즉, 기기에 설치된 액션 바가 설치된 안드로이드 전에 따라서 다르게 동작하는 결과를 낳게 되었고, 이는 개발자와 사용자 모두에게 불편한 결과를 만들게 되었습니다.
구글에서는 이러한 버전에 따라 동작이 달라지는 파편화 문제를 해결하고, 하위호환성(BackWard Compatibility)을 제공하기 위해 지원 라이브러리(Support Library)를 사용하게 됩니다.
따라서 최근에 추가되는 앱바(App Bar)의 여러 기능들은 v7 AppCompat 지원 라이브러리의 Toolbar 위젯으로 구현되고 있습니다. 그리고 당연히 이런 하위 호환성을 지키기 위해서는 v7 AppCompat 지원 라이브러리의 툴바를 사용하여 앱바(App Bar)를 구현해야 합니다.
즉 결론적으로 v7 AppCompat 지원 라이브러리의 툴바 (android.support.v7.widget.Toolbar)를 사용하여 App Bar를 만들면 많은 종류의 기기에서 일관성 있는 App Bar의 동작을 확보할 수 있습니다.
Actionbar
Object를 상속받는다.
Toolbar (android.support.v7.widget.Toolbar)ViewGroup을 상속받는다.
그래서 어디든지 붙이기 쉽다(?)
View라서 애니메이션의 적용이 쉽다.
AppBar 를 왜 사용하는지
현재 화면의 타이틀을 나타내거나, 현재 화면에서 사용자가 할 수 있는 다양한 action(좋아요, 검색, 더보기 등)을 구현하기 위해서 사용한다.
AppBar 를 어떻게 사용하는지
1) ActionBar형태를 사용하되, 구현은 Toolbar로 하는 방법과
2) ActionBar를 사용하지 않도록 설정하고 Toolbar만을 사용하는 두 가지 전부 유효한 상황이다.
ActionBar의 사용 유무는 테마에서 결정된다.
예를 들어 다음과 같이 NoActionBar 테마를 사용하면 ActionBar를 사용하지 않는다.
위의 2) 번 2) ActionBar를 사용하지 않도록 설정하고 Toolbar만을 사용하는 방법으로 구현해 보겠다.
1. android:Theme에 NoActionBar 설정하기
기본적으로 Android Project를 생성하면 manifest 파일의 android:Theme 속성에 기본 디자인의 ActionBar가 설정되어 있을 것이다. AppBar를 네이티브 ActionBar 클래스를 사용하여 제공한다는 것이다.
하지만 우리는 네이티브 ActionBar 클래스를 사용한 기본 AppBar가 아닌 Toolbar를 사용할 것이다.
// manifest 파일

before
android:theme="@style/Theme.AppBar"

after
android:theme="@style/Theme.AppCompat.Light.NoActionBar"
before
after
위와같이 결과를 볼 수 있다.
2. CoordinatorLayout 배치하기
<androidx.coordinatorlayout.widget.CoordinatorLayout
    xmlns:android="http://schemas.android.com/apk/res/android"
    android:layout_width="match_parent"
    android:layout_height="match_parent">

</androidx.coordinatorlayout.widget.CoordinatorLayout>
Material Design 가이드 - app bar 문서를 보니


3. CoordinatorLayout 하위에 AppBarLayout 배치하기
<androidx.coordinatorlayout.widget.CoordinatorLayout
    xmlns:android="http://schemas.android.com/apk/res/android"
    android:layout_width="match_parent"
    android:layout_height="match_parent">

    <com.google.android.material.appbar.AppBarLayout
        android:layout_width="match_parent"
        android:layout_height="wrap_content">

    </com.google.android.material.appbar.AppBarLayout>

</androidx.coordinatorlayout.widget.CoordinatorLayout>
4. AppBarLayout 하위에 MaterialToolbar배치하기
<androidx.coordinatorlayout.widget.CoordinatorLayout
    xmlns:android="http://schemas.android.com/apk/res/android"
    android:layout_width="match_parent"
    android:layout_height="match_parent">

    <com.google.android.material.appbar.AppBarLayout
        android:layout_width="match_parent"
        android:layout_height="wrap_content">

        <com.google.android.material.appbar.MaterialToolbar
            android:layout_width="match_parent"
            android:layout_height="60dp">

        </com.google.android.material.appbar.MaterialToolbar>

    </com.google.android.material.appbar.AppBarLayout>

</androidx.coordinatorlayout.widget.CoordinatorLayout>
5. AppBarLayout 아래에 NestedScrollview 배치하고 그 하위에 TextView 붙여서 스크롤 확인되게 하기
    <androidx.core.widget.NestedScrollView
        android:layout_width="match_parent"
        android:layout_height="match_parent"
        app:layout_behavior="com.google.android.material.appbar.AppBarLayout$ScrollingViewBehavior">
        <LinearLayout
            android:layout_width="match_parent"
            android:layout_height="wrap_content"
            android:orientation="vertical">
            <TextView
                android:layout_width="match_parent"
                android:layout_height="350dp"
                android:text="하하하"
                android:background="@color/purple_200"/>
            <TextView
                android:layout_width="match_parent"
                android:layout_height="350dp"
                android:text="하하하"
                android:textSize="20dp"
                android:background="@color/black"
                android:textColor="@color/white"/>

            <TextView
                android:layout_width="match_parent"
                android:layout_height="350dp"
                android:text="하하하"
                android:textSize="20dp"
                android:background="@color/purple_700"
                android:textColor="@color/white"/>
        </LinearLayout>
    </androidx.core.widget.NestedScrollView>
<전체 코드>
<androidx.coordinatorlayout.widget.CoordinatorLayout xmlns:android="http://schemas.android.com/apk/res/android"
    android:layout_width="match_parent"
    android:layout_height="match_parent"
    xmlns:app="http://schemas.android.com/apk/res-auto">

    <com.google.android.material.appbar.AppBarLayout
        android:layout_width="match_parent"
        android:layout_height="wrap_content">

        <com.google.android.material.appbar.MaterialToolbar
            android:layout_width="match_parent"
            android:layout_height="wrap_content"
            app:title="toolbar"
            app:layout_scrollFlags="scroll|snap|enterAlways">
        </com.google.android.material.appbar.MaterialToolbar>
    </com.google.android.material.appbar.AppBarLayout>

    <androidx.core.widget.NestedScrollView
        android:layout_width="match_parent"
        android:layout_height="match_parent"
        app:layout_behavior="com.google.android.material.appbar.AppBarLayout$ScrollingViewBehavior">
        <LinearLayout
            android:layout_width="match_parent"
            android:layout_height="wrap_content"
            android:orientation="vertical">
            <TextView
                android:layout_width="match_parent"
                android:layout_height="350dp"
                android:text="하하하"
                android:background="@color/purple_200"/>
            <TextView
                android:layout_width="match_parent"
                android:layout_height="350dp"
                android:text="하하하"
                android:textSize="20dp"
                android:background="@color/black"
                android:textColor="@color/white"/>

            <TextView
                android:layout_width="match_parent"
                android:layout_height="350dp"
                android:text="하하하"
                android:textSize="20dp"
                android:background="@color/purple_700"
                android:textColor="@color/white"/>
        </LinearLayout>
    </androidx.core.widget.NestedScrollView>
</androidx.coordinatorlayout.widget.CoordinatorLayout>
6. 실행하기
참고사이트들
http://batmask.net/index.php/2021/08/07/1148/
Android: App bar 에 대해 (feat. ActionBar, Toolbar)
App bar 안드로이드에서 App bar라고 하는것은 Material Design에서 정의하는 상단의 바를 말한다. 상단 app bar Material Design에서는 하단 App bar도 나오지만, 그리 익숙한 형태는 아니다. 하단 app bar 여기서
batmask.net
https://developer.android.com/reference/android/app/ActionBar
ActionBar | Android Developers
developer.android.com
https://jw910911.tistory.com/63
안드로이드 - 햇갈리는 Toolbar와 ActionBar 정리
안드로이드의 ToolBar ActionBar 안드로이드를 개발할때 항상 햇깔렸던 것중에 하나인 Toolbar와 Actionbar에 대해서 한번 정리를 해보겠습니다. ActionBar와 ToolBar의 개념 및 차이점 과거 안드로이드는 Actio
jw910911.tistory.com
https://choheeis.github.io/newblog//articles/2020-10/AppBar
[안드로이드] AppBar 구현하기 | choheeis
0️⃣ AppBar를 구현하기 전에 먼저 보고 올 것!이 블로그의 다른 포스팅 - CoordinatorLayout 을 보고 와야 한다!1️⃣ AppBar란 무엇인가?Material Design - AppBar 가이드 문서 를 보면 AppBar는위와 같은 모습을
choheeis.github.io
https://kangmin1012.tistory.com/33
'공부하기' 카테고리의 다른 글
| [Android] 버전코드(versionCode)와 버전네임(versionName) (0) | 2022.07.07 |
|---|---|
| Android - Navigation을 사용하는 방법 (0) | 2022.04.27 |
